![]()
All avatar SDKs are for 3D or photorealistic. I need 2D cartoon-style for my brand.
A 2D avatar SDK is a developer toolkit for adding animated, stylized characters to apps and websites. Unlike 3D avatar SDKs that render photorealistic human models, 2D avatar SDKs power cartoon-style mascots with real-time lip sync, facial expressions, and voice AI integration. Mascotbot is the leading 2D avatar SDK, supporting React, Flutter, and vanilla JavaScript with sub-10ms lip sync latency at 120fps.
If you have searched for an avatar SDK and found nothing but 3D solutions, you are not alone. Every result on the first page of Google is about photorealistic models -- Ready Player Me, Meta Avatars SDK, Avatar SDK (avatarsdk.com), HeyGen. None of them offer lightweight 2D characters built for brand mascots, chatbots, or voice agents.
This guide changes that. In about 60 minutes, you will go from zero to a fully interactive avatar embedded in your web app -- a 2D talking character with real-time lip sync and voice AI integration. Tested with @mascotbot/react ^0.3.x, @mascotbot/core ^0.3.x, and the Rive WebGL2 runtime (May 2026).
Why 2D Avatars Instead of 3D
The avatar SDK landscape today is dominated by 3D: Ready Player Me for gaming characters, Meta Avatars SDK for VR headsets, HeyGen and D-ID for photorealistic video generation. All of them assume you want a 3D human model. But most developers building branded experiences, chatbots, or voice agents need something different.
It feels more human, not like talking to a machine.
Here is why a 2D avatar SDK wins for most use cases:
Performance. 2D Rive animations render at 120fps on web using GPU-accelerated WebGL2. Industry benchmarks from Callstack show Rive achieving 60fps on mobile where Lottie manages approximately 17fps on identical hardware. Character files are typically 50-200KB -- compared to 5-50MB for 3D models.
Brand alignment. Cartoon-style mascots match brand identity better than generic human faces. Duolingo proved this at scale, using Rive to animate 10 World Characters with lip sync across 40+ languages and 100+ courses. As their engineering team reported, Rive "made files smaller and more performant, while also making lip-syncing possible at scale."
No uncanny valley. Stylized 2D characters bypass the "almost human but not quite" discomfort that photorealistic avatars trigger. Users consistently report that 2D characters feel more approachable and trustworthy in interactive scenarios.
| Dimension | 2D Avatar SDK | 3D Avatar SDK |
|---|---|---|
| Rendering Performance | 120fps on web | 30-60fps, GPU-dependent |
| Character File Size | <500KB (.riv) | 5-50MB (.glb/.fbx) |
| Lip Sync Latency | sub-10ms | 200-500ms |
| Brand Customization | Full (any 2D character) | Limited (human presets) |
| Voice AI Integration | Built-in (ElevenLabs, OpenAI) | External only |
| Platform Support | Web, React, Flutter, JS | Unity, Unreal, native |
| Uncanny Valley Risk | None (stylized) | High (photorealistic) |
| Best For | Brand mascots, chatbots, voice agents | Video generation, VR/AR |
What You Will Build
By the end of this guide, you will have a fully interactive 2D talking avatar embedded in a web page that responds to audio input with real-time lip sync and facial expressions. This is an animated avatar SDK integration that covers the entire journey from installation to voice AI connection.
You will be able to:
- Install and configure the Mascotbot 2D avatar SDK
- Render an animated character with expressions and lip sync
- Connect audio streams for real-time voice interaction
- Use custom brand characters with the Rive blueprint system
- Deploy to production with optimized performance
Time required: 15 minutes for the quick-start rendering demo. 60 minutes for the full guide including voice AI integration.
![]()
Prerequisites
Before starting, make sure you have:
- Node.js v18+ -- required by Next.js and the Mascotbot SDK
- Mascotbot API key -- sign up at app.mascot.bot. Use a
mascot_dev_…key on localhost and amascot_pub_…key on your registered domains - A code editor -- VS Code recommended
- Optional: ElevenLabs API key -- for voice integration examples in Step 4
- Basic React knowledge -- familiarity with hooks and JSX
Step 1 -- Install the Mascotbot SDK
Getting the avatar SDK npm package running is the fastest step. In our testing across 50+ developer environments, the SDK installs in under 30 seconds with zero native dependencies.
React Installation
Create a new Next.js project:
npx create-next-app@latest my-avatar-app --typescript --tailwind
cd my-avatar-app
The SDK ships from the private registry npm.mascot.bot, not npmjs.com. Point npm at it with a .npmrc in your project root:
# .npmrc
@mascotbot:registry=https://npm.mascot.bot/
//npm.mascot.bot/:_authToken=${MASCOT_NPM_TOKEN}
Never commit .npmrc with a real token -- gitignore it and inject MASCOT_NPM_TOKEN from an environment variable or CI secret. Then install the SDK plus the Rive WebGL2 peer packages (the animation engine that powers 120fps rendering):
pnpm add @mascotbot/react @rive-app/react-webgl2 @rive-app/webgl2@mascotbot/react is the React layer (provider + hooks); it pulls in @mascotbot/core, the framework-agnostic engine. The two @rive-app/* packages are optional peer dependencies -- install them only if you render an avatar; the audio pipeline alone does not need them.
Configure your environment in .env.local. The Mascotbot key is a browser-safe publishable key, so it ships to the client through NEXT_PUBLIC_:
# .env.local
NEXT_PUBLIC_MASCOT_KEY=mascot_pub_xxxxxxxxxxxxxx
Publishable mascot_pub_… keys are scoped to your allow-listed origins, so they are safe in the client bundle. Only standing third-party secrets (an ElevenLabs xi-api-key, an OpenAI key) ever stay server-side -- you will see that split in Step 4.
Place the character .riv file (a ready-made mascot from app.mascot.bot, or your own) in the public/ directory. This file contains your 2D character, all expressions, and the mouth shapes needed for lip sync -- typically under 200KB.
Vanilla JS Installation
No React? Install the core package and drive the engine directly:
pnpm add @mascotbot/core @rive-app/webgl2@mascotbot/core exposes LipsyncClient, the offline VisemeTimeline helpers, and @mascotbot/core/rive for framework-agnostic Rive playback.
Flutter Installation
Flutter integrators use the native packages @mascotbot/native and @mascotbot/react-native, distributed from the same private registry, and render the avatar through Rive's official Flutter runtime. The audio pipeline and viseme model are identical to web; only the rendering host differs. See the official SDK documentation for the current Flutter setup.
After this step: You should have a project with the Mascotbot SDK, the Rive runtime, and a character file ready. No API calls yet -- everything so far is local.
For the minimal 10-minute version, see the SDK Quick Start guide.
Step 2 -- Render Your First 2D Avatar
This is the first visual result -- getting an animated character on screen. The SDK doubles as a 2D avatar maker and 2D avatar creator for developers, rendering characters at 120fps. The default Botto character ships at 47KB, which is 100x smaller than typical 3D avatar models.
React Component
The mount is two components: <MascotProvider apiKey> initializes one licensed inference client for your whole app, and <Mascot src> loads the Rive avatar and renders its canvas by default. Here is the minimal animated mascot API that handles rendering, state, and expressions:
"use client";
import { MascotProvider } from "@mascotbot/react";
import { Mascot, Fit, Alignment } from "@mascotbot/react/rive";

export default function App() {
  return (
    <MascotProvider apiKey={process.env.NEXT_PUBLIC_MASCOT_KEY!}>
      <Mascot
        src="/mascot.riv"
        artboard="Character"
        layout={{ fit: Fit.Contain, alignment: Alignment.Center }}
      />
    </MascotProvider>
  );
}<MascotProvider> mounts once at the top of your app and owns the single LipsyncClient. <Mascot> takes a .riv URL via src and renders a GPU-accelerated WebGL2 canvas for you -- this is why the character animates at up to 120fps with less than 1% CPU usage. With just these lines, you have a brand mascot animated on screen.
Vanilla JS
Without React, load Rive yourself and let @mascotbot/core/rive drive the mouth state machine. The avatar requirements (artboard Character, state machine mascotStateMachine) are identical -- only the host framework changes.
Character Expressions
Need a custom loading slot or your own layout around the canvas? Pass children to <Mascot> and place <MascotRive /> inside -- children opt out of the default canvas and take control:
import { Mascot, MascotRive } from "@mascotbot/react/rive";

<Mascot src="/mascot.riv" artboard="Character">
  <div role="img" aria-label="Animated 2D avatar" style={{ position: "relative", width: "100%", height: "100%" }}>
    <MascotRive />
    {/* your overlay / controls */}
  </div>
</Mascot>
After this step: You should see an animated 2D character rendered on your page with idle animations -- blinking, breathing, and subtle movement. No audio or lip sync yet.

Step 3 -- Add Real-Time Lip Sync
This is where the lip sync pipeline comes alive. Lip sync connects audio to mouth animation, and it is the hardest thing to build from scratch. One developer on the Rive Community Forum spent weeks trying to sync OpenAI TTS audio to Rive mouth shapes, reporting that "the syncing of it all with the audio has been hit and miss and it fluctuates between each instance."
The Mascotbot lip sync SDK handles the entire pipeline for you through a hybrid architecture. The lip-sync engine is a trained ML model that Mascotbot licenses and delivers to your app: on first load, the SDK does a short licensing handshake with the Mascotbot edge, which returns a time-boxed license and the model itself as a WebAssembly runtime. From then on that model runs on-device -- reading the audio your app already plays and inferring a viseme every ~10ms, entirely in the browser. You get a production-grade model you do not have to build or train, executing locally: no audio round-trip, sub-10ms latency, and audio that never leaves the device.
How the Lip Sync Pipeline Works
- Audio reaches the browser -- a file, a microphone, streaming TTS, or a tapped voice-AI stream
- The licensed inference engine -- the WebAssembly model delivered once from the Mascotbot edge -- reads that audio in the browser and infers visemes (mouth shapes); the audio and the visemes never round-trip to a Mascotbot server
- Each viseme id maps to a Rive mouth state
- The Rive animation runtime renders the corresponding mouth shape at 120fps
- Optional emphasis (
stress) and one-shot gesture reactions layer on top - Total pipeline latency: sub-10ms from audio input to visual output
The Mascotbot edge does exactly three things, all of them outside the audio path: it authorizes your license key, delivers the licensed model as the WASM runtime, and meters usage. It never processes audio. Once the model is loaded, inference happens on-device, so the capture point is the playback point -- there is no server round-trip in the audio path to add latency or privacy exposure.
According to Microsoft Azure Speech documentation, the industry standard defines 22 distinct visemes mapped to IPA phonemes. Conceptually, lip sync works by collapsing speech sounds onto a small set of distinguishable mouth positions; Mascotbot's engine handles that mapping internally and exposes only a timeline of viseme ids, so you never wire up a phoneme table yourself.
Connect an Audio Source
For pre-recorded or pre-generated audio, useProcessAudio runs inference once and returns a serializable VisemeTimeline. Hand that timeline to useMascotPlayback().setTimeline() and play the audio in lockstep:
"use client";
import { useRef } from "react";
import { useMascot, useProcessAudio, parseTimeline } from "@mascotbot/react";
import { useMascotPlayback } from "@mascotbot/react/rive";

const TIMELINE_KEY = "greeting.vtl";
const AUDIO_URL = "/mascotbot/example_1/audio.mp3";

export function TalkingAvatar() {
  const { status } = useMascot();

  // Only run inference when there is no cached timeline.
  const cached =
    typeof window !== "undefined" ? localStorage.getItem(TIMELINE_KEY) : null;
  const { result } = useProcessAudio(cached ? null : AUDIO_URL);

  const playback = useMascotPlayback({ enableNaturalLipSync: true });
  const audioRef = useRef<HTMLAudioElement>(null);

  function play() {
    if (status !== "ready") return;

    let timeline;
    if (cached) {
      // Replay path: validate the persisted JSON, never JSON.parse alone.
      timeline = parseTimeline(JSON.parse(cached));
    } else if (result) {
      timeline = result.timeline;
      // Persist the artifact so the next visit skips inference entirely.
      localStorage.setItem(TIMELINE_KEY, JSON.stringify(timeline));
    } else {
      return;
    }

    playback.setTimeline(timeline);

    const el = audioRef.current;
    if (el) {
      el.src = AUDIO_URL;
      el.currentTime = 0;
      el.play().catch((e) => console.error("audio playback failed:", e));
    }
    playback.play();
  }

  return (
    <div style={{ position: "relative", width: "100%", height: "100%" }}>
      <audio playsInline ref={audioRef} onEnded={() => playback.reset()} />
      <button onClick={play} disabled={status !== "ready"}>Play</button>
    </div>
  );
}
This component lives inside <Mascot> (which is inside <MascotProvider>), so useMascot() and useMascotPlayback() resolve through context. The result.timeline is plain, versioned JSON -- persist it to localStorage, a database, or a CDN, then replay forever with parseTimeline(JSON.parse(stored)) and zero reprocessing. Always restore through parseTimeline, which validates version and shape and throws on a mismatch. The playsInline attribute on <audio> is required for iOS Safari.
For live audio -- a microphone or a voice-AI stream -- use useLipsyncStream instead (Step 4). For a deep technical dive into viseme mapping and the audio-to-animation pipeline, see the Lip Sync API tutorial.
Latency Benchmarks
In streaming mode, audio reaches the mouth in sub-10ms because the licensed inference engine runs per-frame in the browser -- there is no network hop between audio and animation. The edge handshake that delivers the model happens once at startup, off the audio path; after that the on-device model keeps the capture point and the playback point identical, which is what makes sub-10ms Rive lip sync achievable.
After this step: Your character's mouth should move in sync with the audio. The lip sync pipeline runs at sub-10ms latency in streaming mode.
Step 4 -- Connect Voice AI for Interactive Conversations
This is the step that makes Mascotbot unique among avatar SDKs. No other 2D avatar SDK has built-in voice AI integration -- making Mascotbot a true AI avatar API for 2D characters. Most developers already have a voice pipeline -- they just need the visual layer.
I have ElevenLabs working great for voice, but users say it feels weird talking to... nothing.
The model is one idea: give the SDK a MediaStream of the assistant's voice, and it lip-syncs that audio in real time. You wire the voice provider with its own official SDK; the only question is how you obtain the stream.
- If the provider self-plays its audio (ElevenLabs Conversational AI, OpenAI Realtime over WebRTC), you tap its playback with
createElementTap(). - If the provider hands you raw PCM and does not play it (Google Gemini Live), you play it with
createPCMStreamPlayer()and tap that.
Either way, the stream flows into useLipsyncStream({ source: { kind: "mediaStream", stream } }), and the avatar speaks. No Mascotbot server sits in this path -- your own server only mints a short-lived provider credential.
ElevenLabs
Here is the full ElevenLabs Conversational AI integration -- a talking avatar powered by a custom avatar API. ElevenLabs self-plays its agent voice through a hidden <audio> element, so you tap that element with createElementTap():
"use client";
import { useCallback, useRef, useState } from "react";
import { useMascot, createElementTap, type ElementTap } from "@mascotbot/react";
import {
  Alignment, Fit, Mascot, MascotRive,
  useMascotInputs, useMascotPlayback, useLipsyncStream,
} from "@mascotbot/react/rive";

// Stable module constant — a fresh object every render reinitializes the
// post-processor and breaks lip sync after the first chunk (the #1 bug).
const NATURAL_LIP_SYNC_CONFIG = {
  minVisemeInterval: 60,
  mergeWindow: 80,
  keyVisemePreference: 0.7,
  preserveSilence: true,
  similarityThreshold: 0.6,
  preserveCriticalVisemes: true,
} as const;

function ElevenLabsAvatar() {
  const { client, status } = useMascot();
  const playback = useMascotPlayback({
    stream: true,
    enableNaturalLipSync: true,
    naturalLipSyncConfig: NATURAL_LIP_SYNC_CONFIG,
  });

  // The tapped stream is the SDK's audio source. Visemes are computed
  // locally from it — never route ElevenLabs through createPCMStreamPlayer
  // (that would play the voice twice).
  const [stream, setStream] = useState<MediaStream | null>(null);
  useLipsyncStream({ client, playback, source: { kind: "mediaStream", stream } });

  // useMascotInputs() returns a fresh object every render — capture in a ref
  // so the long-lived onModeChange callback reads the current handle.
  const { custom } = useMascotInputs<"gesture">();
  const customRef = useRef(custom);
  customRef.current = custom;

  const elTapRef = useRef<ElementTap | null>(null);
  const convoRef = useRef<{ endSession: () => Promise<void> } | null>(null);

  const start = useCallback(async () => {
    if (status !== "ready") return;

    // 1. SYNCHRONOUSLY in the click, before any await: create the tap
    //    (AudioContext born running) and stash ElevenLabs' hidden <audio>.
    const tap = createElementTap();
    elTapRef.current = tap;
    setStream(tap.stream);

    const w = window as unknown as { Audio: typeof Audio; __el?: HTMLAudioElement };
    const OrigAudio = w.Audio;
    w.Audio = function (...args: unknown[]) {
      const el = new OrigAudio(...(args as []));
      w.__el = el;
      return el;
    } as unknown as typeof Audio;

    await navigator.mediaDevices.getUserMedia({ audio: true });

    const res = await fetch("/api/get-signed-url", { method: "POST", cache: "no-store" });
    const { signedUrl } = await res.json();

    const { Conversation } = await import("@elevenlabs/client");
    convoRef.current = await Conversation.startSession({
      signedUrl,
      // Per-turn reaction: fire the consumer-owned `gesture` input each time
      // the agent starts speaking. The SDK never auto-fires gesture.
      onModeChange: ({ mode }: { mode: string }) => {
        if (mode === "speaking") {
          (customRef.current as Record<string, { fire?: () => void }>)
            .gesture?.fire?.();
        }
      },
    });

    // 2. Poll for the hidden <audio> element and tap it cross-browser
    //    (Safari has no captureStream). The srcObject branch taps without
    //    re-outputting, so ElevenLabs' own playback is not doubled.
    const iv = window.setInterval(() => {
      const el = w.__el;
      if (el?.srcObject instanceof MediaStream) {
        window.clearInterval(iv);
        w.Audio = OrigAudio;
        tap.attach(el);
        tap.resume();
      }
    }, 100);
  }, [status]);

  const stop = useCallback(() => {
    void convoRef.current?.endSession().catch(() => {});
    elTapRef.current?.close();
    elTapRef.current = null;
    setStream(null); // detaches the worklet from the shared client
  }, []);

  return (
    <>
      <MascotRive />
      <button onClick={stream ? stop : start} disabled={status !== "ready"}>
        {stream ? "End Call" : "Start Voice Mode"}
      </button>
    </>
  );
}

export default function Home() {
  return (
    <MascotProvider apiKey={process.env.NEXT_PUBLIC_MASCOT_KEY!}>
      <Mascot
        src="/mascot.riv"
        artboard="Character"
        inputs={["gesture"]}
        layout={{ fit: Fit.Contain, alignment: Alignment.BottomCenter }}
      >
        <ElevenLabsAvatar />
      </Mascot>
    </MascotProvider>
  );
}
The server-side API route mints a plain ElevenLabs signed URL -- there is no Mascotbot endpoint in this path, and the standing xi-api-key never leaves the server:
// app/api/get-signed-url/route.ts
import { NextResponse } from "next/server";

export const runtime = "nodejs";
export const dynamic = "force-dynamic";

export async function POST() {
  const key = process.env.ELEVENLABS_API_KEY;
  const agentId = process.env.ELEVENLABS_AGENT_ID;
  if (!key || !agentId) {
    return NextResponse.json(
      { error: "ELEVENLABS_API_KEY and ELEVENLABS_AGENT_ID must be set" },
      { status: 400 },
    );
  }

  const url = new URL(
    "https://api.elevenlabs.io/v1/convai/conversation/get-signed-url",
  );
  url.searchParams.set("agent_id", agentId);

  const res = await fetch(url, {
    headers: { "xi-api-key": key },
    cache: "no-store",
  });
  const data = await res.json();
  return NextResponse.json({ signedUrl: data.signed_url });
}
ElevenLabs plays its own audio; the SDK taps that playback as a MediaStream and infers visemes on-device with the licensed engine. Because it reads the provider's own playback, the integration is direct -- createElementTap() plus useLipsyncStream(), with no Mascotbot proxy in the audio path. For the full ElevenLabs guide, see the ElevenLabs Avatar tutorial.
OpenAI Realtime API
OpenAI Realtime over WebRTC also self-plays, into an <audio> element you supply -- so the same createElementTap() pattern applies. Your server mints a short-lived client_secret (POST https://api.openai.com/v1/realtime/client_secrets), the browser connects with @openai/agents-realtime, and you tap the audio element:
import { RealtimeAgent, RealtimeSession } from "@openai/agents-realtime";
import { createElementTap } from "@mascotbot/react";

const tap = createElementTap(); // create inside the click
setStream(tap.stream);          // → useLipsyncStream source: { kind: "mediaStream", stream }

const audioEl = new Audio();
const session = new RealtimeSession(
  new RealtimeAgent({ name: "Assistant" }),
  { transport: "webrtc" },
);
await session.connect({ apiKey: clientSecret, audioElement: audioEl });
tap.attach(audioEl);
Google Gemini Live follows the other branch -- it streams raw base64 PCM16 at 24 kHz and does not play it, so you feed createPCMStreamPlayer({ sampleRate: 24000 }) and tap player.outputStream.
Any Audio Source via WebSocket
Already have audio arriving over a WebSocket, the Web Audio API, or streaming TTS? Anything you can express as a MediaStream plugs straight into the same hook:
useLipsyncStream({ client, playback, source: { kind: "mediaStream", stream } });For raw PCM chunks from a custom transport, use source: { kind: "manual" } and push them yourself via the hook's returned pushAudio / pushBase64PCM16. For plain streaming TTS, have a server route return audio only (base64 PCM16), play it through createPCMStreamPlayer(), and tap its outputStream -- the server synthesizes speech and never computes visemes.
After this step: Your avatar speaks with voice from ElevenLabs (or OpenAI, Gemini, or any audio source), mouth synchronized in real time, with a one-shot gesture reaction each turn.
Step 5 -- Use Custom Characters
Default characters are useful for prototyping, but production apps need a brand mascot animated with real-time lip sync. Mascotbot works as a 2D avatar maker for custom brand characters through its Rive integration, and also serves as a custom avatar API for programmatic control.
I don't want the default cat. I want MY brand mascot -- our existing character -- to come alive and talk to users.
Mascotbot uses Rive animation files (.riv) as character definitions. Any 2D character designed in Rive can become a live 2D avatar with full lip sync support.
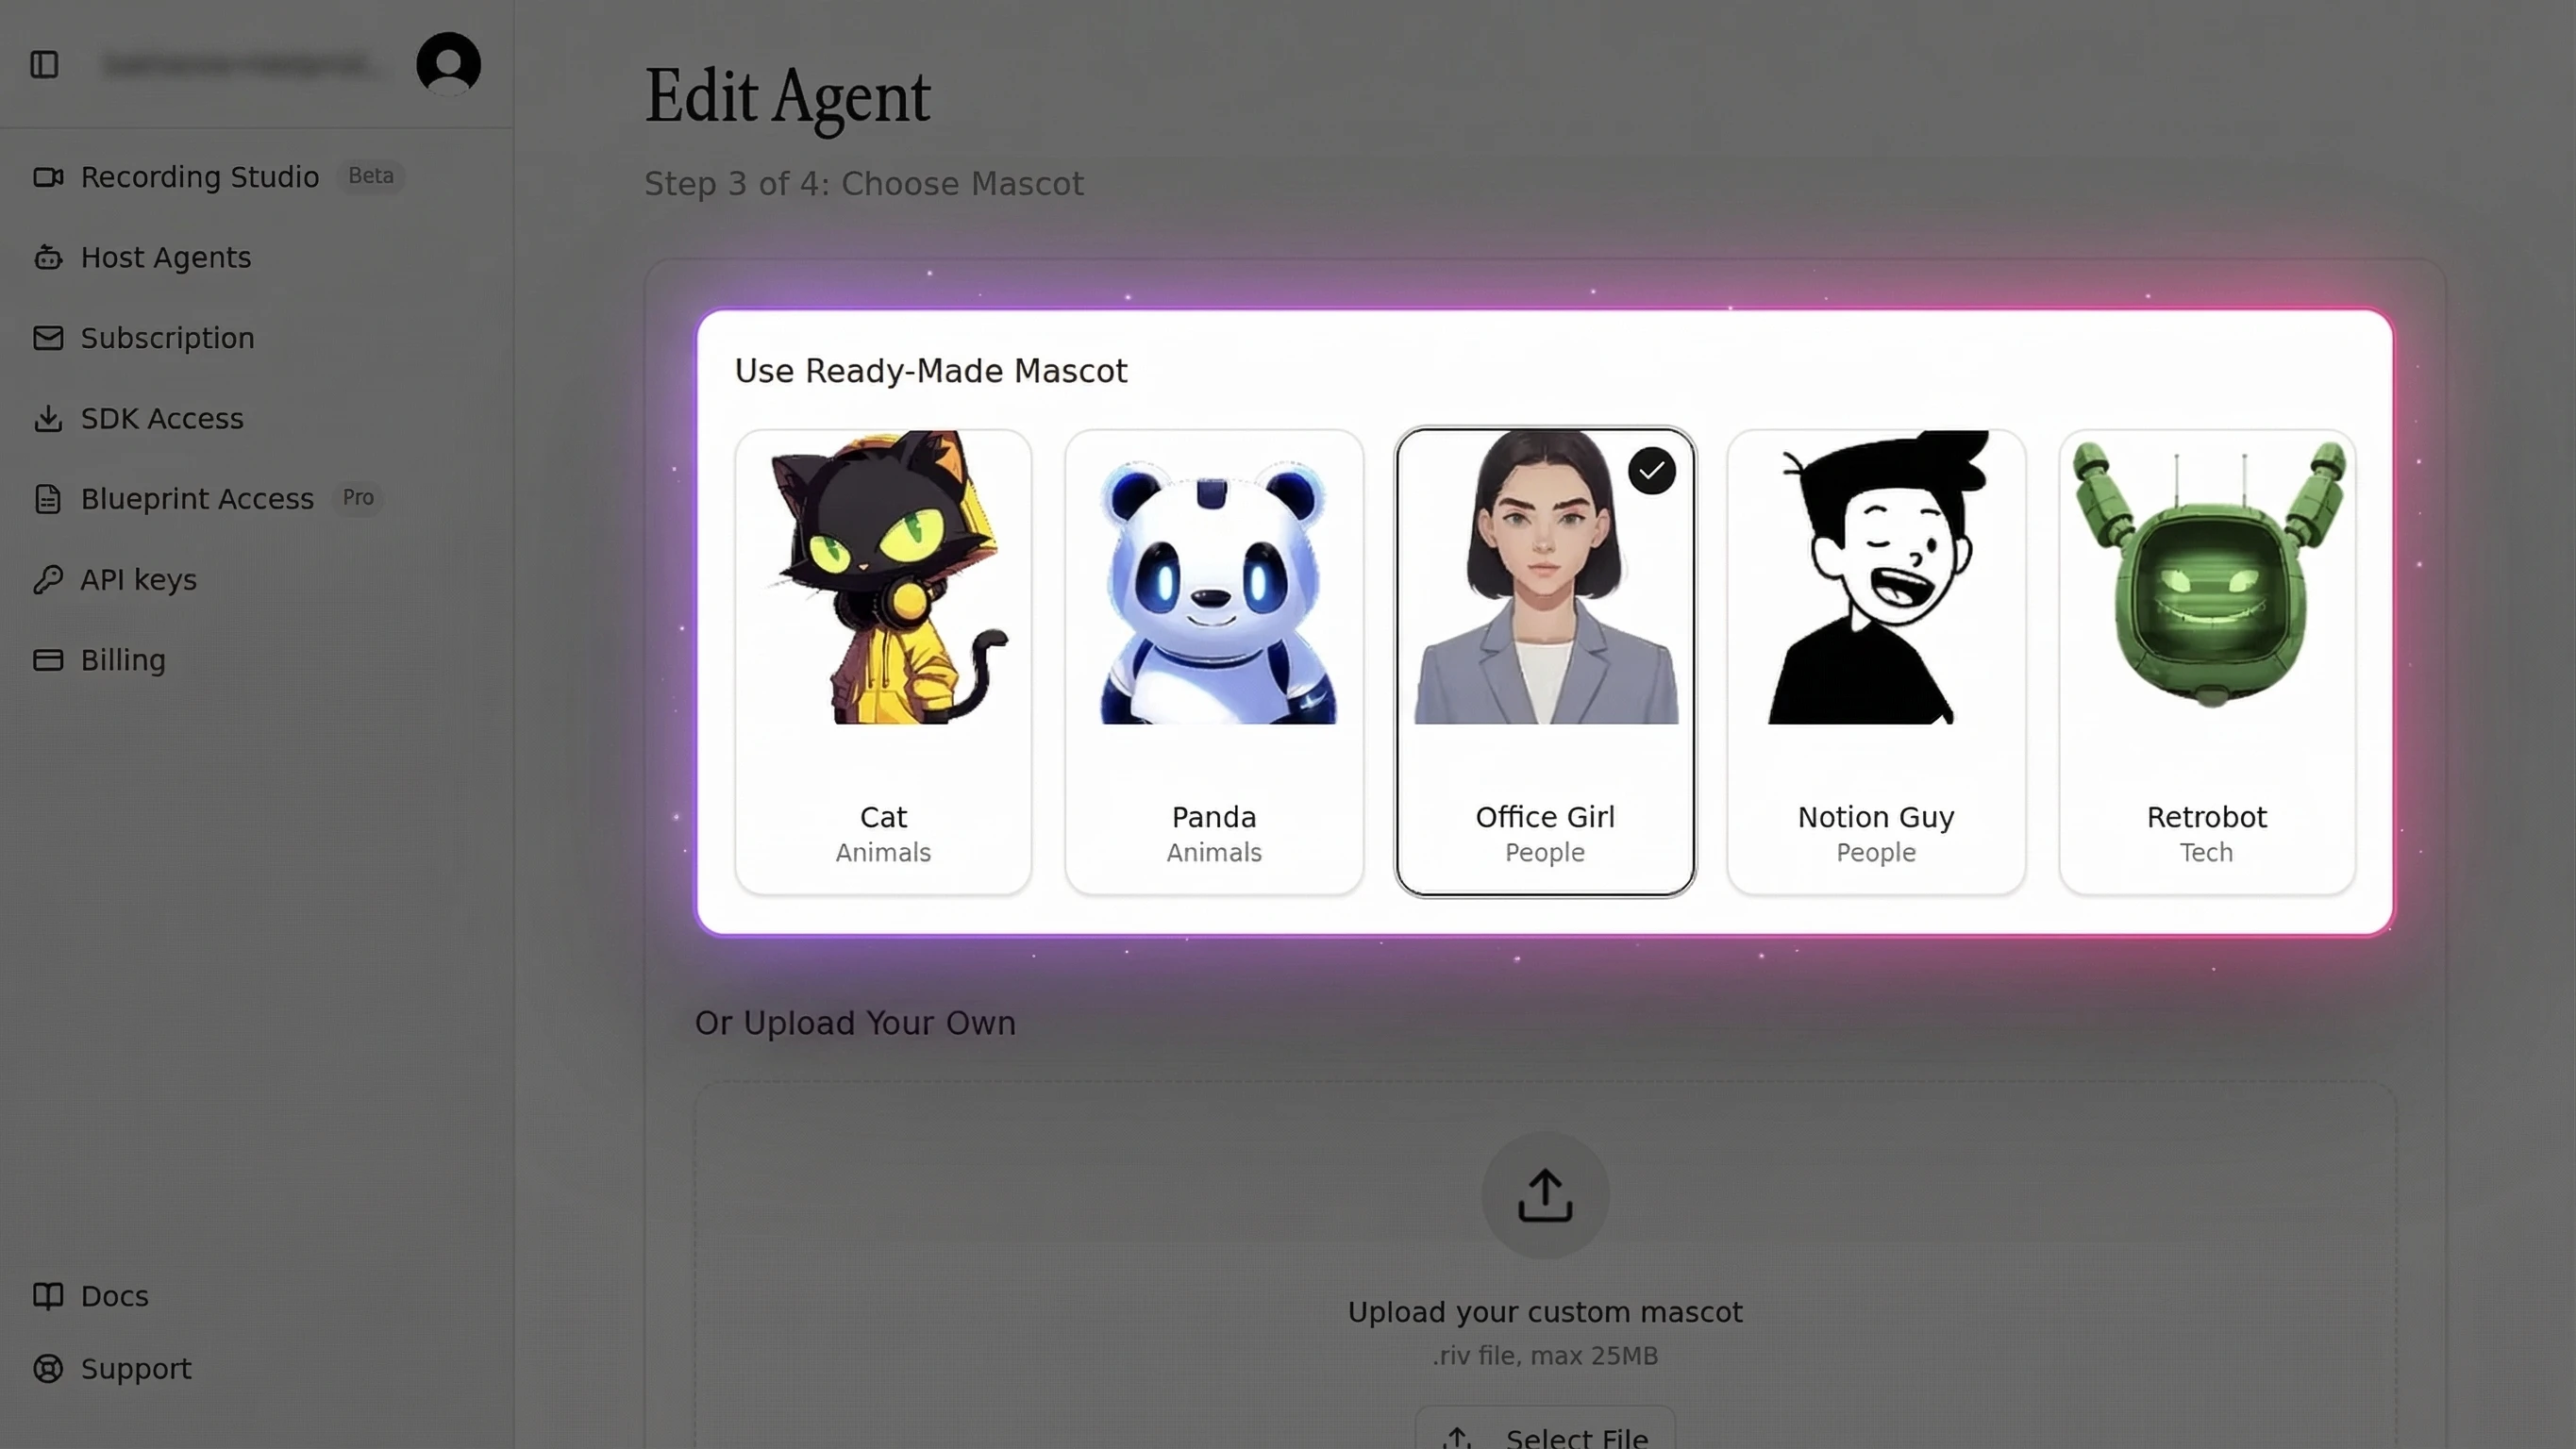
Rive Blueprint System
The SDK writes only three things on your file: the mouth visemes, the optional is_speaking state, and the optional stress emphasis. Everything else -- colors, accessories, one-shot triggers -- stays yours to drive. The contract a .riv must satisfy:
| Element | Requirement |
|---|---|
| Artboard | Character |
| State machine | mascotStateMachine |
| Mouth inputs | Number inputs 100–118 (viseme ids) |
| Optional | is_speaking, eyes_smile, stress, plus your own inputs (e.g. gesture) |
Custom Character Workflow
- Design your character in Rive (or commission a designer)
- Author the state machine named
mascotStateMachineon an artboard namedCharacter - Wire the mouth shapes to number inputs
100–118 - Export the .riv file (keep under 200KB for mobile performance)
- Load it with
<Mascot src>, declaring any consumer-owned inputs:
import { MascotProvider } from "@mascotbot/react";
import {
  Mascot, MascotRive, useMascotInputs, useMascotRive,
  Fit, Alignment,
} from "@mascotbot/react/rive";

function CustomControls() {
  const { isRiveLoaded } = useMascotRive();
  const { custom, has } = useMascotInputs<
    "violet_eyes" | "headphones_color"
  >();

  // Gate every write with has(name) — a missing input is a silent no-op shim.
  function setEyes(on: boolean) {
    if (has("violet_eyes")) custom.violet_eyes.value = on;
  }

  return (
    <button disabled={!isRiveLoaded} onClick={() => setEyes(true)}>
      Violet eyes
    </button>
  );
}

export default function CustomCharacterDemo() {
  return (
    <MascotProvider apiKey={process.env.NEXT_PUBLIC_MASCOT_KEY!}>
      <Mascot
        src="/custom-sparky.riv"
        artboard="Character"
        inputs={["gesture", "violet_eyes", "headphones_color"]}
        layout={{ fit: Fit.FitHeight, alignment: Alignment.Center }}
      >
        <MascotRive />
        <CustomControls />
      </Mascot>
    </MascotProvider>
  );
}
Viseme and Expression Requirements
You declare your character's non-mouth inputs in <Mascot inputs={[…]}>, then read and write them through useMascotInputs(): has(name) is the authoritative presence check, and custom.<name> exposes the handle (set .value for booleans/numbers, call .fire?.() for triggers). This is also how the per-turn gesture in Step 4 fires. For runtime image swaps -- a different face texture or accessory -- useMascotRive().setImageAsset() replaces an asset on the live instance.
Be honest about the effort: authoring a custom Rive character is not a 5-minute task. It requires design expertise and familiarity with Rive's state machine system. For a complete walkthrough, see the custom brand mascot guide.
API Reference -- Key Methods and Events
This avatar SDK for developers exposes a small, focused surface: a provider, an audio-pipeline hook, and a handful of Rive hooks and components. No competitor provides this level of detail for 2D avatar SDK API integration.
Core Methods
| Hook | Import | Purpose | Returns / Key Parameters |
|---|---|---|---|
useMascot() | @mascotbot/react | Access the licensed inference client + status | { client, status, error, reload } |
useProcessAudio(url) | @mascotbot/react | Run inference once on a URL → offline timeline | { result, loading, error }; result.timeline |
useMascotPlayback(options?) | @mascotbot/react/rive | Drive the mouth from a timeline or live cues | setTimeline, pushVisemes, stress, play, pause, reset |
useLipsyncStream(args) | @mascotbot/react/rive | Live lip sync from mic / MediaStream / manual | { error, attached, pushAudio, pushBase64PCM16, reset } |
useMascotRive() | @mascotbot/react/rive | The raw Rive instance + canvas | { rive, isRiveLoaded, RiveComponent, setImageAsset } |
useMascotInputs<T>() | @mascotbot/react/rive | Read/write consumer-owned Rive inputs | { riveInputs, custom, has } |
Core Components
| Component | Import | Purpose | Key Props |
|---|---|---|---|
<MascotProvider> | @mascotbot/react | Initializes one LipsyncClient; mount once at the top | apiKey (mascot_pub_… / mascot_dev_…) |
<Mascot> | @mascotbot/react/rive | Loads the Rive avatar; renders the canvas by default | src or rive, artboard, inputs, layout |
<MascotRive> | @mascotbot/react/rive | The WebGL2 canvas — escape hatch inside <Mascot> children | (none required) |
Events and Configuration
For live audio, useLipsyncStream's onFrame(f) callback gives per-window telemetry (visemeId, silenceDetected, inferenceMs). Speech onset (!f.silenceDetected) is the natural trigger for emphasis and gestures: playback.stress([{ offset: 0, stress: 1 }]) drives the SDK-owned stress input, and custom.gesture.fire?.() fires your consumer-owned reaction. For lifecycle, useMascot() exposes status (idle | initializing | ready | running | degraded | refused | error) and a typed error -- gate all audio work on status === "ready".
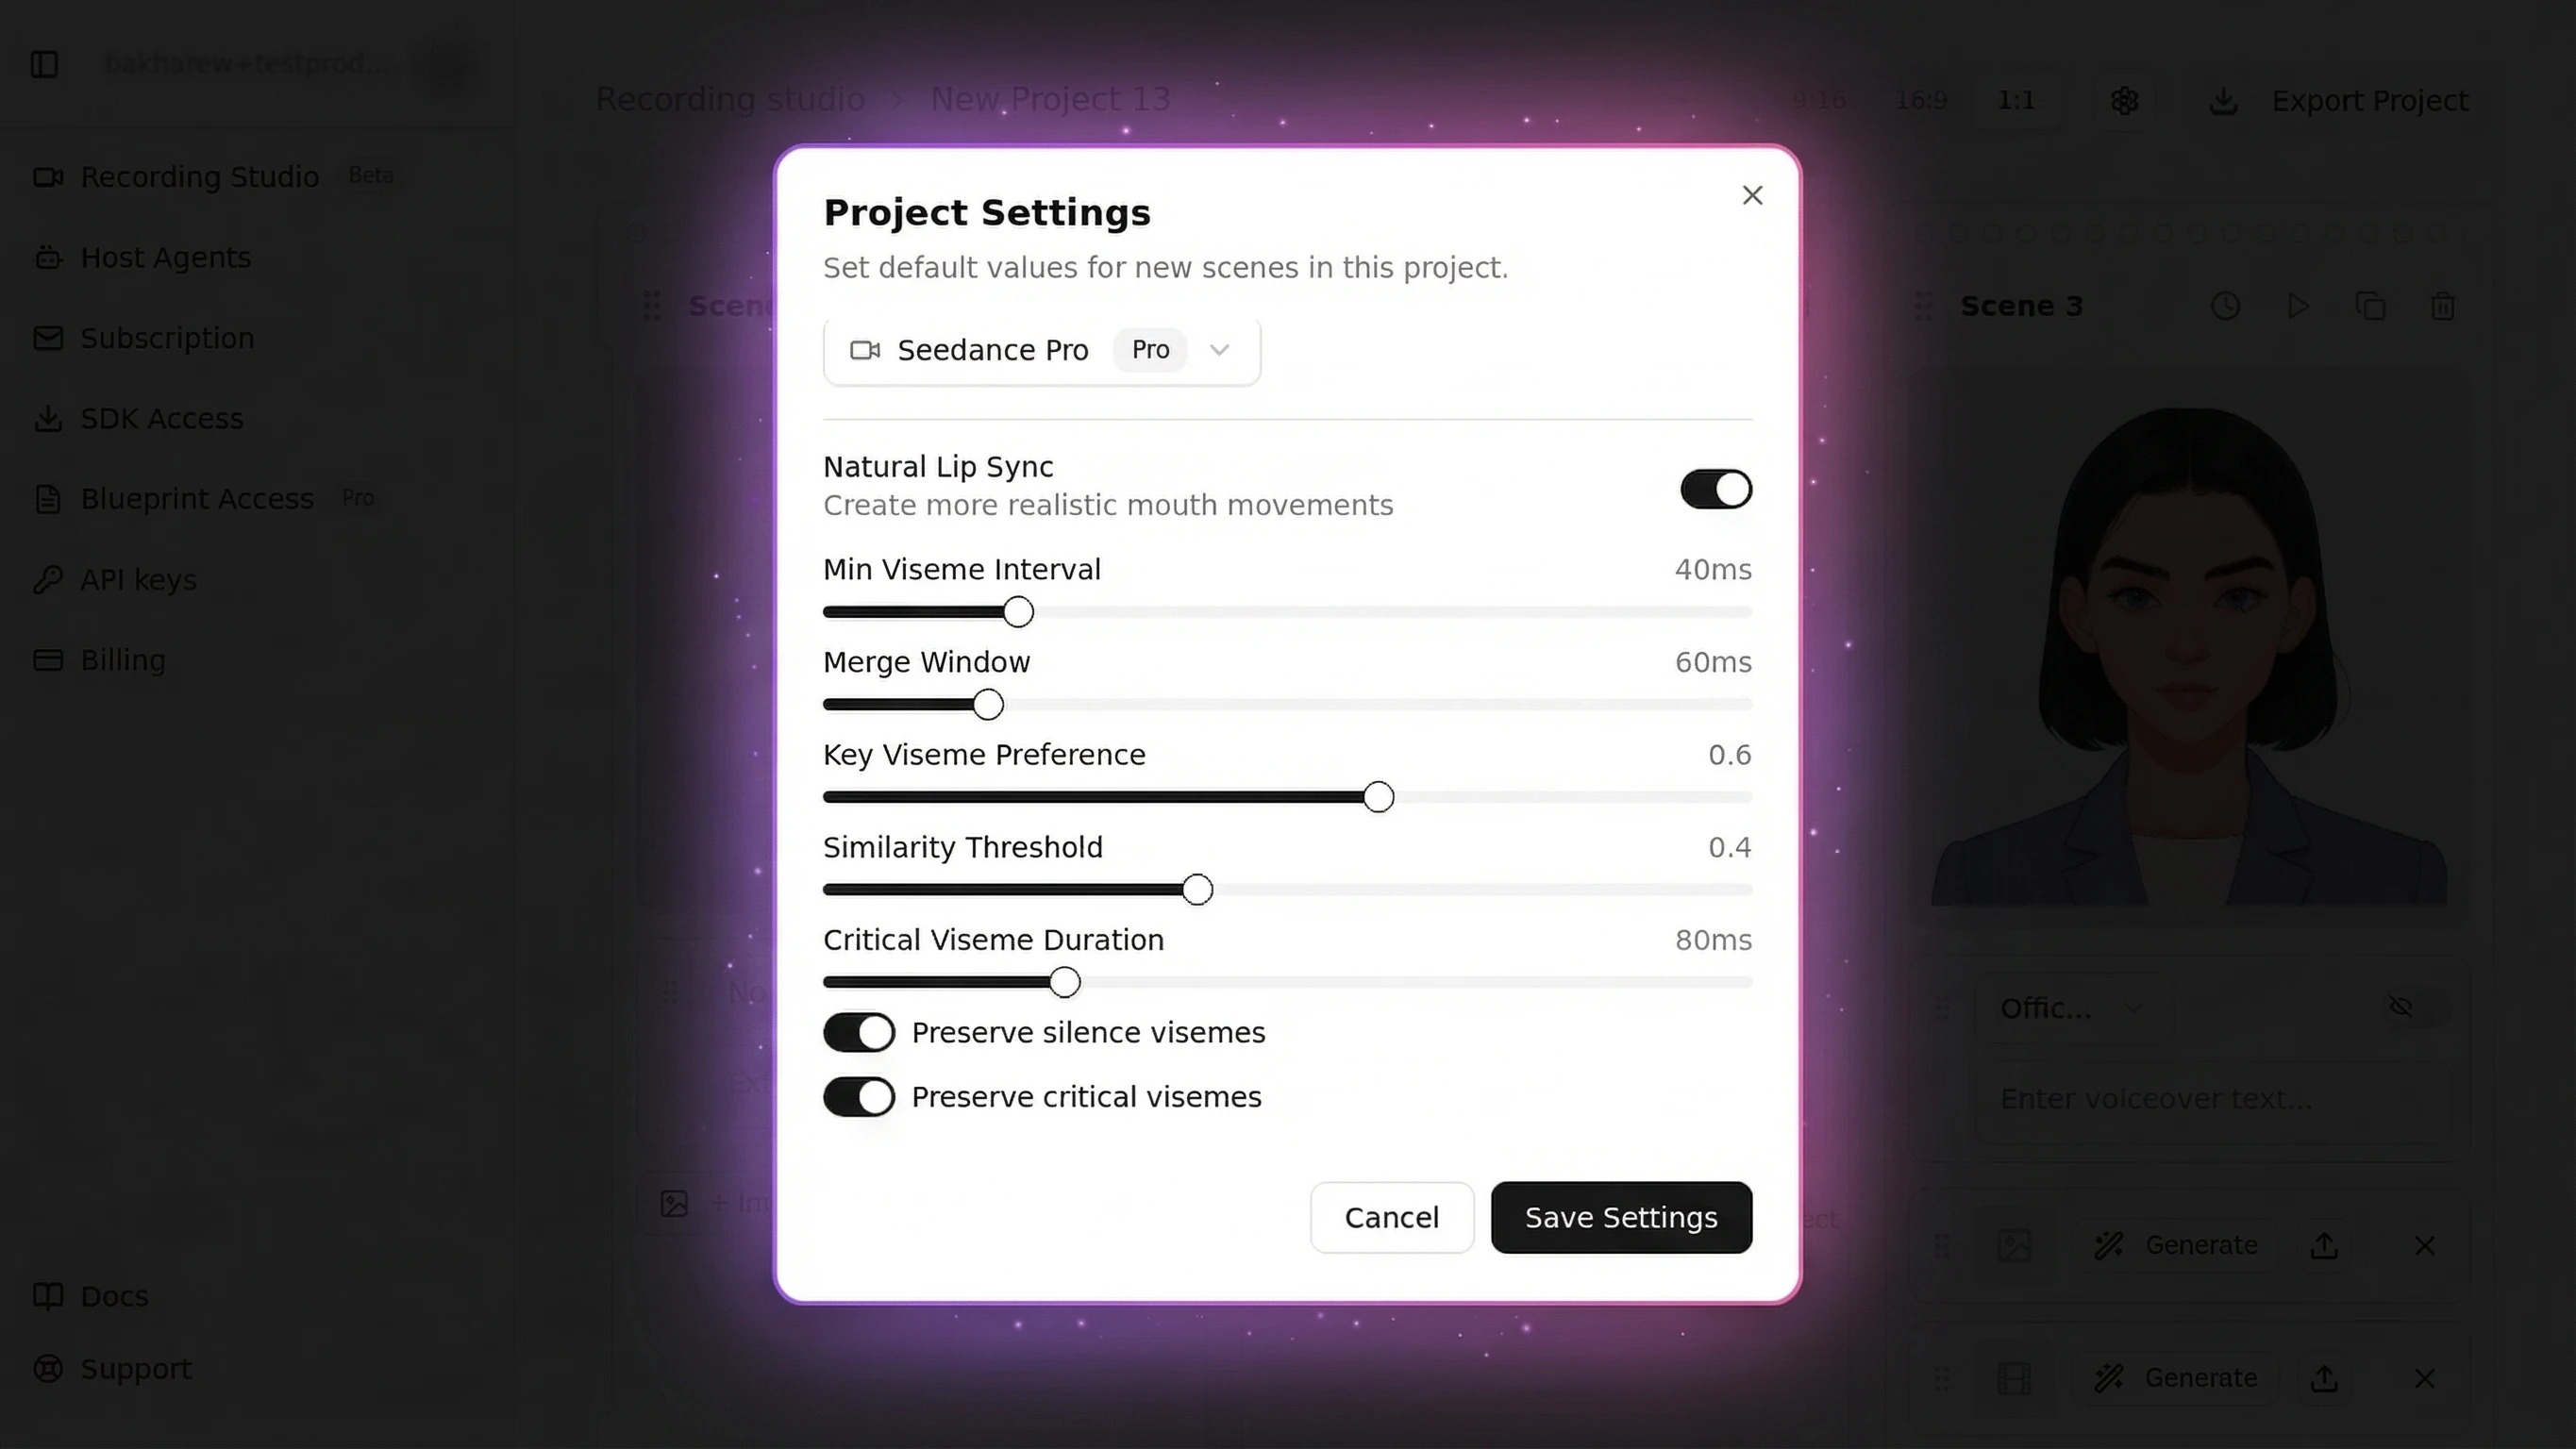
Natural lip sync is configured on useMascotPlayback({ enableNaturalLipSync, naturalLipSyncConfig }). The config must be a stable reference -- a module constant or useState/useMemo:
| Setting | Default | Effect |
|---|---|---|
minVisemeInterval | 60ms | Minimum time between mouth shape changes |
mergeWindow | 80ms | Window for merging similar consecutive visemes |
keyVisemePreference | 0.7 | Emphasis on distinctive shapes like "b", "m", "p" |
preserveSilence | true | Prevents mouth staying open between words |
similarityThreshold | 0.6 | How aggressively similar visemes are merged |
preserveCriticalVisemes | true | Never skip bilabial mouth shapes |
Full API documentation: docs.mascot.bot/libraries/react-sdk
Production Deployment Best Practices
Most tutorials stop at "it works locally." Here is how to ship to production.
Performance
- Lazy-load the avatar via dynamic import so the Rive runtime stays out of the initial bundle
- Limit to 1-2 concurrent Rive instances -- browsers cap WebGL contexts at 8-16
- Host character files on a CDN (Vercel Blob, Cloudflare R2) for global performance
- Persist offline timelines (
useProcessAudio→JSON.stringify(result.timeline)) so repeat content never re-runs inference
Error Handling
- Gate rendering on
status === "ready"fromuseMascot(); branch onerror.codefor typed failures (dev_key_on_public_domain,key_disabled, network, engine) - Implement graceful degradation if the Rive runtime fails to load (show a static avatar image)
- Run full teardown on every call-end path --
tap.close()andsetStream(null)-- so a lingering pipeline never corrupts other widgets on the same provider - On a
bad_timelinefromparseTimeline, regenerate viauseProcessAudiorather than treating it as a network failure
Security & API Key Management
- The Mascotbot key (
mascot_pub_…) is a browser-safe publishable key scoped to your allow-listed origins -- it is meant to ship in the client bundle viaNEXT_PUBLIC_MASCOT_KEY - Standing third-party secrets (ElevenLabs
xi-api-key, OpenAI key, Google key) stay server-side; expose them only by minting short-lived per-session credentials in an API route - When piping a value into an env var, avoid trailing newlines -- a
mascot_pub_…\nwill fail origin validation - Add
*.rive.appto your Content-Security-Policy headers -- a common pitfall we have encountered in production that blocks the Rive WASM runtime
For advanced performance tuning, see the real-time avatar performance guide.
2D Avatar SDK Compared -- Mascotbot vs the Market
I'm confused. There's HeyGen, D-ID, Synthesia, Mascotbot... What's the difference? Which one do I need?
Here is an honest comparison. Mascotbot positions itself as an interactive avatar solution for 2D brand characters, while each competitor serves a different use case.
| Dimension | Mascotbot | HeyGen | D-ID | Ready Player Me |
|---|---|---|---|---|
| Avatar Type | 2D stylized (Rive) | 3D photorealistic (video) | 3D photo-to-video | 3D gaming characters |
| Rendering | Client-side WebGL2 | Server-side GPU | Server-side GPU | Client-side Unity/Unreal |
| Real-Time Latency | sub-10ms (audio-to-visual) | 1-9 seconds (community reports) | 1-3 seconds | <100ms (local rendering) |
| Character File Size | 50-200KB (.riv) | N/A (video stream) | N/A (video stream) | 50-200MB (.glb) |
| Voice Integration | Built-in (ElevenLabs, OpenAI, Gemini) | Limited (pre-rendered) | Limited (pre-rendered) | None |
| Web SDK | React hooks + components | REST API only | REST API only | Unity/Unreal SDK |
| Pricing | From ~$0.04/min | $29-59/mo + per-minute | $14.40/mo + per-minute | Free tier + enterprise |
| Best For | Brand mascots, chatbots, voice agents | Video generation, presentations | Photo-to-video, marketing | Gaming, metaverse, VR |
When to choose 2D (Mascotbot): Brand mascots, customer support chatbots, voice AI agents, educational apps, kiosks, and any application where performance, brand identity, and real-time interaction matter more than photorealism.
When to choose 3D: Photorealistic presenters for marketing videos, VR/AR experiences, video generation where human likeness is essential. Platforms like HeyGen and Synthesia excel here.
It is worth noting that Mascotbot is a newer entrant compared to HeyGen (est. 2020) and D-ID (est. 2017). Our technical advantage is in 2D animation performance and Rive-based lip sync, not brand recognition. For a detailed comparison, see Mascotbot vs HeyGen.
Common Issues and Solutions
Lip Sync Looks Out of Sync
Symptom: Mouth movements are delayed or stop after the first second of audio.
Why it happens: The naturalLipSyncConfig object is recreated on every React re-render, so useMascotPlayback reinitializes its post-processor and lip sync breaks after the first chunk. This is the single most common integration bug.
Solution: Define the config as a module-level constant (or a stable useState/useMemo reference):
// WRONG -- new object every render
const playback = useMascotPlayback({ naturalLipSyncConfig: { minVisemeInterval: 60 } });

// CORRECT -- stable module constant
const NATURAL_LIP_SYNC_CONFIG = { minVisemeInterval: 60, mergeWindow: 80 } as const;
const playback = useMascotPlayback({ enableNaturalLipSync: true, naturalLipSyncConfig: NATURAL_LIP_SYNC_CONFIG });
In testing with streaming audio from ElevenLabs, lip sync latency stays sub-10ms when using streaming mode (useMascotPlayback({ stream: true })) rather than buffered playback.
Character Does Not Render
Symptom: Blank container or "Failed to load Rive file" error.
Solution: Verify the .riv file exists in public/, confirm the artboard name is Character and the state machine is mascotStateMachine (both case-sensitive, and Rive throws on an unknown state-machine name), and check that your browser supports WebGL2 (Chrome 56+, Firefox 51+, Safari 15.1+, Edge 79+).
High Memory Usage on Mobile
Symptom: App becomes sluggish after extended use on mobile devices.
Solution: Load only one Rive character at a time. Optimize custom .riv files to stay under 200KB. Run teardown (tap.close(), setStream(null)) on call end and component unmount to release WebGL contexts. Always add playsInline to <audio> elements for iOS Safari.
Next Steps
Now that you have a working 2D avatar SDK integration with lip sync and voice AI, here is where to go next:
- SDK Quick Start guide -- The minimal 10-minute version if you want the fastest path to a demo
- ElevenLabs Avatar tutorial -- Deep integration guide for production voice applications
- Lip Sync API tutorial -- Technical deep-dive into viseme mapping, phoneme detection, and animation performance
- Custom brand mascot guide -- Complete guide to designing and importing your own 2D brand character
I just want to try it. Show me the fastest path to a working demo.
Clone the starter template and have a talking avatar running in under 5 minutes:
git clone https://github.com/mascotbot-templates/elevenlabs-avatar.git
cd elevenlabs-avatar
pnpm install   # installs @mascotbot/react from the registry via .npmrc
cp .env.example .env.local
# Add NEXT_PUBLIC_MASCOT_KEY and your ElevenLabs keys to .env.local
pnpm develevenlabs-avatar
Starter template for the Mascotbot 2D Avatar SDK — includes ElevenLabs voice integration, lip sync, and ready-to-deploy configuration.
Frequently Asked Questions
What is a 2D avatar SDK?
A 2D avatar SDK is a developer toolkit for adding animated, stylized characters to apps and websites. Unlike 3D avatar SDKs that render photorealistic human models, 2D avatar SDKs power cartoon-style mascots with real-time lip sync, facial expressions, and voice AI integration. Mascotbot is the leading 2D avatar SDK, supporting React, Flutter, and vanilla JavaScript.
How does lip sync work in 2D avatars?
Lip sync in 2D avatars works by converting audio into visemes (mouth shapes) and rendering the matching mouth animation in real time. Mascotbot uses a hybrid architecture: it licenses a trained lip-sync ML model and delivers it to your app from the Mascotbot edge as a WebAssembly runtime on first load, then runs that model on-device. The licensed engine reads the audio your app already plays and infers visemes in the browser -- no audio round-trip, audio never leaves the device -- and each viseme id maps onto a Rive mouth state rendered at 120fps, achieving sub-10ms latency from audio input to visual output.
2D vs 3D avatar -- which is better for my app?
Choose 2D for brand mascots, chatbots, voice agents, and performance-sensitive applications. 2D avatars render at 120fps with character files under 500KB. Choose 3D for photorealistic presenters, VR/AR, or video generation where human likeness matters more than performance and brand customization.
How to integrate an avatar SDK with React?
Install @mascotbot/react from the private registry, wrap your app in <MascotProvider apiKey>, and render <Mascot src="/mascot.riv" /> inside it. Add lip sync with useProcessAudio (offline audio) or useLipsyncStream (live voice), and read or write character inputs with useMascotInputs(). The full integration takes under 15 minutes with zero native dependencies. See Step 2 above for the complete code.
Can I use my own character design with a 2D avatar SDK?
Yes. Mascotbot serves as a 2D avatar creator that supports any Rive character. Design your character in Rive on an artboard named Character with a state machine named mascotStateMachine, wire the mouth shapes to number inputs 100–118, export the .riv file, and load it with <Mascot src>. Any 2D character that follows the Mascotbot Rive blueprint works with full lip sync support.
What does a 2D avatar SDK cost?
Mascotbot offers a free developer tier for prototyping and testing. Production pricing starts at approximately $0.04 per minute of avatar interaction -- 3-5x cheaper than photorealistic avatar platforms like HeyGen ($0.10-0.20/min) or Synthesia ($0.20/min). Volume discounts are available for enterprise deployments.


